In one of the first posts I wrote when I started this blog I tried to give a general overview of Git, which has quickly become probably the most successful version control system in current use, especially in new and open-source projects. I’ve been a regular Git user since the time when I wrote that post, and recently I found myself in a situation where I had to set up a Git repository for a client on a computer running Windows Server 2003, which I would have to access through the Internet. What I initially thought would be a pretty straightforward task turned out to be much harder than I expected. To begin with, Git repositories with remote access are mostly set up on computers running Linux, where things are considerably simpler. This is due to the fact that Linux offers much better support for the SSH protocol that Git uses. When one searches the web for information, it’s hard to find good documentation about how to set Git up for remote access on Windows, and some of the resources I found were often not completely reliable. Spiked by the challenge and all the troubles I bumped into, I’ve decided to write down a quick guide of all the steps for my future reference and share it here just in case others may find it useful too. If you find anything inaccurate or just feel like commenting or sharing any additional information on this topic, please don’t hesitate to use the comments area below.
1. The Proposed Workflow
As a peer-to-peer system, Git is very flexible in allowing a lot of different workflows. Scott Chacon’s seminal book on Git has a chapter, Distributed Workflows, that briefly goes through some of the likely workflows that we may come across in real-life projects. The workflow I’m interested in is the first one Chacon describes: the ‘centralised workflow’, which consists in a bare repository sitting on a server computer. Such a central repository should regularly be backed up, and a number of developers will sync the code on their computers with it.
So, basically, what I intend to do is set up a Git bare repository (the ‘shared repository’) on a server computer running Windows which is connected to the Internet and which only authorised users can access through their Git clients.
The steps I describe in this post can actually be generalised to any other workflow. It would simply be a matter of treating as a ‘server’ any computer that must allow pulling changes from it and as a ‘client’ any computer which pulls and pushes changes from the others.
2. The Server: Setting Up a User Account for Development Tasks
Before setting up the SSH server and the Git repository we will need to create a new user account in Windows with administrator rights [Edit 13 Sep 2014: Actually, as suggested in one of the comments below, a regular user account may be enough for this]. While it is not strictly necessary to create a new account for this, we will need a user account to open the SSH connections for Git communication, and having a specific user account for this can help administration and logging tasks.
On my server computer running Windows Server 2003, I’ve opened up Control Panel/Computer Management/System Tools/Local Users and Groups/Users (the actual names may vary depending on Windows version and localisation) and I’ve created a new administrative account with the user name ‘dev’.
3. The Server: Choosing and Installing SSH Software
Remote communication in Git is handled by means of the Secure Shell (SSH) protocol. There are two other protocols that can be used, HTTP and Git’s own protocol, but these are more limited in use. If we want full access to the remote repository with user authentication, then SSH becomes the only option. When we install Git for Windows we get an SSH client bundled with the Git program, but we will need to set up an SSH server on the computer that hosts the central shared repository, which must listen to connections on the SSH port (by default 22). Unlike the situation in both Linux and Mac OS X, there is no default SSH server coming with Windows out of the box, so we need to install one.
The problem is that it is not easy to choose between the available options. Right now (May 2013) there are several SSH products for Windows available but the licencing conditions can be tricky. The Wikipedia article Comparison of SSH Servers contains a handy list of SSH software. That list reveals that there aren’t many options available. There is also a stackoverflow thread on SSH servers for Windows that offers some information and useful comments about the various possibilities.
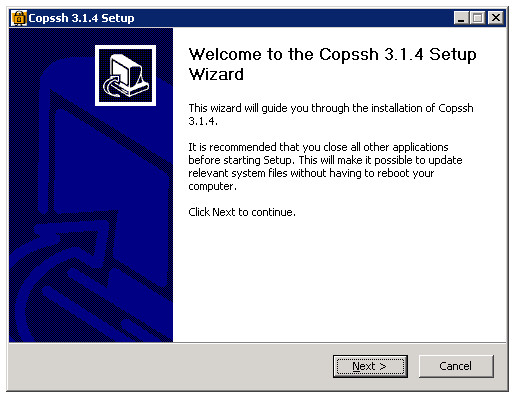
The first option I considered was to install Cygwin, a distribution of a variety of Linux tools for use under Windows, and run OpenSSH on top of Cygwin. This would replicate the standard setup of SSH on a Linux system. I thought about this possibility, but Cygwin is pretty massive and since I only needed an SSH server, I decided it would make more sense to find an option that integrates with Windows better, rather than trying to replicate a whole Linux universe on the Windows machine. This led me to two commercial products WinSSHd (now rebranded as “Bitvise SSH Server”) and Copssh. I didn’t want to pay, if possible, so these two tools didn’t look like an optimal solution for me. But it turns out that CopSSH used to be free and the old free version is still available with a GNU General Public Licence. The more recent versions cost money and have more features, but since what I need server-side is something very simple just to use it with Git, this old free version is fine. Note that CopSSH uses Cygwin and OpenSSH internally, but it only installs a small subset of the whole thing and the installation is pretty straightforward. If I hadn’t found this free version, I’d probably have gone the Cygwin+OpenSSH route, but using CopSSH has made things easier [Edit 13 Sep 2014: The situation is different in 2014. The older CopSSH 3.1.4 is no longer offered on the Itefix website (reasonably enough, as old versions of security software will inevitably have known vulnerabilities), and there are new versions of the software, including a free one (see below). As the situation regarding SSH software for Windows may continue to evolve, I recommend that anyone reading this check the characteristics and licencing/pricing information of the available SSH products].
So, the first thing to do on the machine that will act as a server is to download and install this software:
1. Download the free version of CopSSH 3.1.4. At the time of writing it is available at the CopSSH website: https://www.itefix.no/i2/content/copssh-free-edition [Edit 13 Sep 2014: As mentioned above, the older free edition of CopSSH that I used is no longer available. The newer version can be downloaded from https://www.itefix.net/content/copssh-free-edition. I haven’t got round to using it, so I’ve left the rest of this article unedited with the original references to the older 3.1.4 version. Anyway, the steps to follow should be similar.].
2. Unzip the installer and run it.
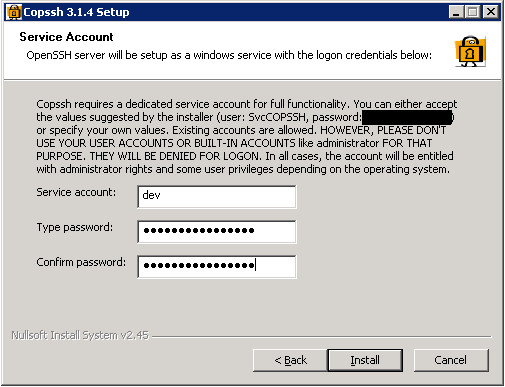
3. The installer suggests a user account under which the Windows service will run. Rather than letting the installer create a new user account, I have entered the ‘dev’ user name and the password that I set up before (section 1).
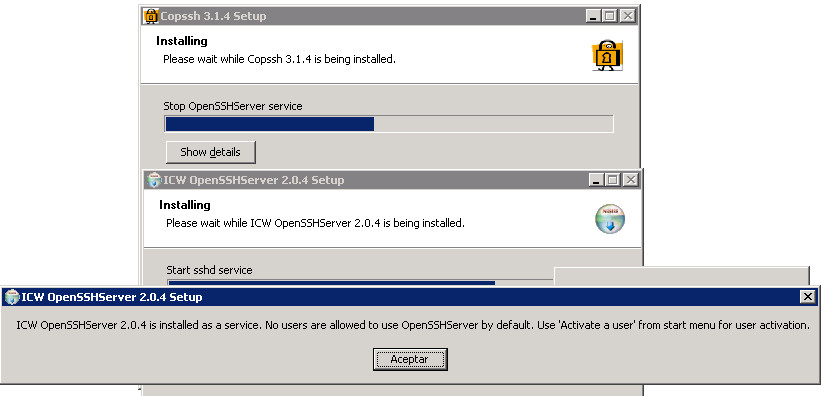
4. When the installation is complete, the installation wizard informs you that you will need to activate a user for the newly-created SSH server:
5. In the Windows Start menu there is now a ‘Copssh’ folder with several entries. Select the ‘01. Activate User’ option and in the dialog that appears uncheck the options (unless you know what you’re doing and need any of that) and enter the user name that we’ve created before:
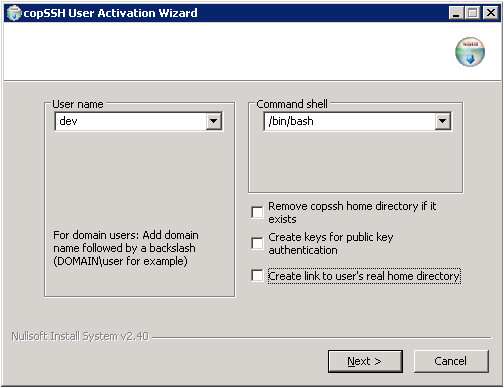
Note that you may need to include a domain with the user name, like ‘DOMAIN\dev’.
Once CopSSH has been installed, the SSH server should be running as a Windows service. Let’s check this.
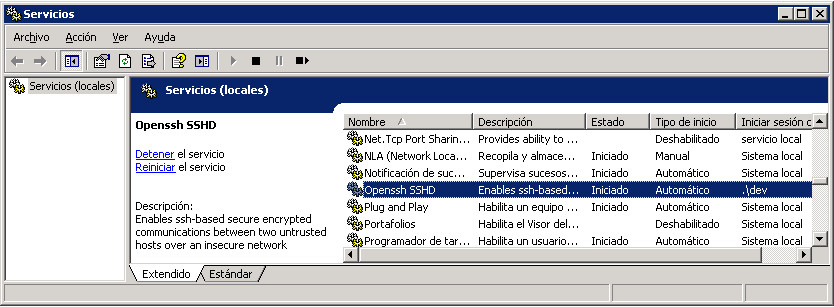
6. Open the ‘Services’ dialog (under ‘Administrative Tools’) and check that there is an entry ‘Openssh SSHD’. It should appear as ‘Started’ (or the equivalent localised term like Spanish ‘Iniciado’ in my screenshot):
4. The Server: Configuring the SSH Settings
Now that the SSH server is up and running, we need to review its settings. The underlying OpenSSH implementation that CopSSh uses has two configuration files in the etc directory. If you’ve installed CopSSH in the default location, you’ll need to open C:\Program Files\ICW (or C:\Program Files(x86)\ICW on 64-bit editions of Windows). There you will find an etc directory. There are two configuration files there: ssh_config and sshd_config. The first one affects the ssh.exe program and the second one the daemon version sshd.exe. We will make our changes in both files to avoid any mismatches between the two.
There are two settings we might want to change. First, the SSH software supports both authentication with cryptographic keys and with a plain combination of a user name and a password. Authentication with keys is much more secure. Because of that, we will disable password-based authentication.
A second setting you may want to change is the port used for the SSH traffic. The default port for SSH is port 22, but if you prefer to use another one, now is the time to change it.
7. In a text editor like Notepad++ (plain Notepad has problems with the Linux-style line feeds), open up the C:/Program Files [(x86)]/ICW/etc/ssh_config file. The default settings appear as commented-out lines starting with ‘#’. We will need to edit the PasswordAuthentication option (line 25) by uncommenting it and setting it to no:
[...]

   PasswordAuthentication no

[...]
Similarly, you would edit the #Port 22 line if you want to use a different port number.
8. In a text editor, open up the C:/Program Files [(x86)]/ICW/etc/sshd_config file and set the PasswordAuthentication option (line 61) to no:
[...]

PasswordAuthentication no

[...]
Again, if you’re changing the port number you should also look for the Port option and edit it.
5. The Server: Establishing a Home Directory
By default, the SSH server will treat the user directory dev as its home directory. We may want to change this to a different location, like C:\repositories. The home directory is specified in the passwd configuration file. Note that some SSH implementations rely on a ‘HOME’ environment variable to query the home path, but Copssh doesn’t seem to support this, so editing the passwd file is apparently the only way of customising the home path.
9. In a text editor, open up the C:/Program Files [(x86)]/ICW/etc/passwd file. The last line should be something like the following:
dev:unused_by_nt/2000/xp:0000:000:U-DOMAIN\dev,s-1-0-00-000000000-0000000000-0000:/home/dev:/bin/bash
10. Edit the last line in the passwd file, replacing /home/dev with the home path for the Git repositories. Forward slashes must be used as directory separators and drive units like C:\ must be replaced with /cygdrive/C/. If the home directory we want is C:\repositories then:
dev:unused_by_nt/2000/xp:0000:000:U-DOMAIN\dev,s-1-0-00-000000000-0000000000-0000:/cygdrive/C/repositories:/bin/bash
11. Save the passwd file and close it.
12. In the home directory we will have to create a directory with the name .ssh. It may be tricky to get Windows to create a directory with a name starting with ‘.’ so the easiest way is to open a command console and type:
cd C:\repositories

mkdir .ssh
13. In the .ssh directory create an empty text file with the name authorized_keys. We will edit it later.
6. The Client Computer: Creating a Cryptographic Key Pair for Authentication
We want to be able to authenticate the client when it connects to the server. This will be done through public-key authentication (much safer than a user/password combination), which requires that the client generate a pair of cryptographic keys and makes its public key known to the server. Let’s do this now.
I will assume that the client computer is also running Windows (Windows 7 in my tests), and I am going to use the free and open-source software PuTTY as an SSH client and also as a tool for key generation.
14. On the client computer, download and install PuTTY (http://www.chiark.greenend.org.uk/~sgtatham/putty/download.html).
15. Open up the PuTTYgen program that comes bundled with PuTTY (you’ll find it under the Start/All Programs/PuTTY menu) and click the ‘Generate’ button:
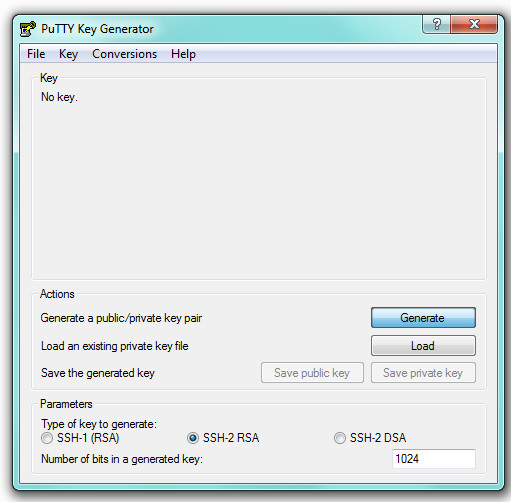
After clicking ‘Generate’ you’ll need to move the mouse over the dialog in order to generate some randomness. That will ensure that the newly-created cryptographic keys are secure.
16. Once the keys have been generated, type a passphrase to encrypt the private key and click the ‘Save private key’ button. You’re then prompted to save it to disk. I saved it as C:\ssh_keys\git_access_key.ppk.
What we have saved to disk in the .ppk file is a cryptographic private key that we must not give to anyone. It must stay within the client computer. What we will need to copy to the server is the public key, which is not a secret at all and can be visible to others. The public key is what the server needs in order to verify that the data connection can only come from a client that has the matching private key. Note that we don’t need to save the public key to any file since it can be recalculated from the private key whenever it is needed. We’d simply load the private-key file with PuTTYgen if we need to check the generated public key again.
So, we now need to copy that public key to the server.
17. Select and copy the public-key text that appears in the field ‘Public key for pasting into OpenSSH authorized_keys file’. You can customise the ‘Key comment’ field with a descriptive comment.

18. Paste the public-key text into an e-mail or a text file that you can later open from the server (remember, again, that this is the public key so it doesn’t matter if we’re sending it over through a communication channel that is not particularly secure). In a test of mine, this was:
ssh-rsa AAAAB3NzaC1yc2EAAAABJQAAAIEAlOISku1zWfUfhhpy2gtgWOboHqjdSz3WO+c+l9zEvD8
Lzlrbn8eYxxo9H69lPRUuRIb6RpzYNq3ISU9uROEv/ZuTH6dSzL3zJHcE4uiFd6gNdi27LsEYSq1LV9
maRE4osQz0u/P4VbmR+6lCylaaTD9AQMDSI9T0yKhwx47uI2E= Public key from A. Developer’s laptop
The blue string is the actual public key, but we’ll need to paste the whole thing into the authorized_keys file on the server.
7. The Server: Registering the Client’s Public Key
Now we need to access the public key that we generated client-side and authorise it on the server machine.
19. On the server computer, open the e-mail or the text file where the public-key text was stored and copy it.
20. Open the C:\repositories\.ssh\authorized_keys file in a text editor and paste the whole line beginning with ‘ssh-rsa’ and ending with the custom comment, without line breaks.
21. Save the file.
8. The Client Computer: Testing the SSH Connection
Now we can test that the SSH connection can be established correctly from the client computer where we generated the cryptographic key pair.
22. On the client machine, open up PuTTY and in the ‘Session’ category enter the IP or the URL of the server and make sure that SSH is selected as the ‘Connection Type’.
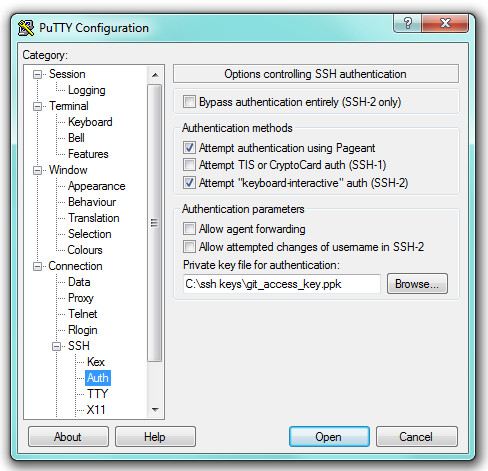
23. On the left-hand tree view of categories select ‘Connection’/‘SSH’/‘Auth’ and enter the path of the .ppk file you’ve saved as the ‘Private key file for authentication’:
24. Click ‘Open’.
25. A ‘PuTTY Security Alert’ appears telling us that the server we’re connecting to is unknown. Hit ‘OK’ so that the remote machine will be cached as a known server from now on.
26. A PuTTY connection console opens up and prompts us to enter a user name. Type ‘dev’ (or whatever Windows account name you chose in step 1 above).
27. The connection console should display the message ‘Authenticating with public key’ followed by the comment we added at the end of the public-key text:

28. We can now test that the SSH connection is active by typing a command like ls to list the directories and files. We should be able to see whatever is hanging from the home directory, C:\repositories, on the server.
If the connection has succeeded, we have succeeded in setting up the SSH communication between server and client. It should now be very easy to make Git work.
9. Setting Up a Shared Git Repository on the Server
First we need to ensure that Git for Windows is installed on the server computer.
29. If Git hasn’t been installed yet on the server computer, download the latest version of the installer and run it. As of this writing (May 2013), the download link is https://code.google.com/p/msysgit/downloads/list.
There remain two important configuration issues on the server side. First, attempts to execute Git commands remotely will fail because Windows won’t recognise commands such as git-upload-pack. We need to add a couple of paths to the ‘Path’ environment variable so that Windows can find all the Git-related executables. Besides, the Git installation comes with an SSH server (which, as I explained in section 3 above, is much trickier to set up than Copssh) and we need to tell Git to use the SSH executable installed by the Copssh server. This is also done through an environment variable.
30. Open up the Control Panel/System dialog and in the Advanced Options tab click the Environment Variables button. A Dialog displaying the environment variables appears.
31. In the ‘System Variables’ list select ‘Path’ and click the ‘Modify’ button. Add two additional paths by appending the string ‘;C:\Program Files\Git\bin;C:\Program Files\Git\libexec\git-core’ (assuming C:\Program Files\Git is the Git installation path; it may of course be different because of non-English localisation or if you’ve installed it in a custom location. Also note that this step may not be necessary if you installed Git for Windows with the option that allows running Git from a Windows command prompt).
32. In the ‘Environment Variables’ dialog, click the ‘New’ button under the ‘System Variables’ list. A small dialog prompts you to enter a name and a value for a new environment variable. Enter the name ‘GIT_SSH’ and the value ‘C:\Program Files\ICW\Bin\ssh.exe’ (i.e. the path for the ssh.exe program installed by Copssh; it may be different if you’ve used a custom location or if your system has a localised name for ‘Program Files’). Click ‘OK’ to validate the new environment variable.
33. Click ‘OK’ to close the ‘Environment Variables’ dialog.
At this point the server should be ready to accept incoming connections from the client computer. In order to test that, we should create a simple test project on the server.
34. On the server, create a Git bare repository (git init --bare) in the directory we’ve designated as the home directory. In my test I created a bare repository at C:\repositories\test_project.git, cloned it locally and added a test file, which I committed and pushed. We will now try to clone this test_project.git repository from the client computer.
10. Testing the Git Client Connection to the Central Repository
Now we have to test that we can clone the test_project.git repository from the client computer. We’re assuming that the client is also running Windows and that a cryptographic key pair for authentication was previously generated with PuTTYgen (steps 15 and 16 above). We need to tell Git that we’re using PuTTY for SSH key authentication, which is done through the GIT_SSH environment variable. This can be done through the Git for Windows installation process if you install it after you’ve been using PuTTY. Otherwise you’ll have to manually add or edit the GIT_SSH environment variable so that it points to the C:\Program Files [(x86)]\PuTTY\plink.exe path.
35. On the client computer make sure that Git is installed. If you’re installing it now and the installation process prompts you to choose the SSH executable (see reference 7 below for more details), select the path to the plink.exe program that comes with PuTTY (typically C:\Program Files [x86]\PuTTY\plink.exe). Otherwise, if Git is already installed, open the Windows ‘System Properties’ dialog from the Control Panel, access the ‘Advanced’ tab and click the ‘Environment Variables…’ button. Add a variable ‘GIT_SSH’ with the value ‘C:\Program Files [(x86)]\PuTTY\plink.exe’ (or whatever your plink.exe path is).
We’re ready to clone the test_project.git project.
36. Open a Git Bash console and type (substituting The URL or IP address of your server for ‘example.com’):
git clone ssh://dev@example.com:/~/test_project.git
You can of course do the same using a graphic interface like Git GUI or TortoiseGit.
If authentication fails, you’ll have to make sure that Pageant, the PuTTY program that runs on the background for authentication, is running and is aware of the git_access.ppk keys. If using TortoiseGit, you may need to enter the path for the git_access.ppk file in the ‘Load Putty Key’ field (I think that’s not necessary if Pageant is running).
A working copy of the test_project.git repository should have popped up on your computer. You can now make changes, commit those changes and push them to the repository to check that everything is working fine.
In the URL for the repository we can drop the ‘ssh://’ prefix since that is what Git uses by default. We need the ‘/~’ part, which refers to the home directory that the SSH server is using (C:\repositories in my test). I’ve found that Copssh tries to find the repository in the C: root if ‘/~’ is missing. Finally, if you’ve set up Copssh on the server to listen to connections on a port different from the default 22, the custom port number should be indicated after the colon that follows the host.
11. Registering authorised users
Sections 6 and 7 above describe the steps required to authorise a client by registering the public key with the server. That procedure should be repeated for other authorised users. Note that some references you can find on the Internet suggest that you can create the cryptographic key pairs on the server and then give the private key to the authorised user. I strongly advise against doing that. Sending a .ppk file attached to an e-mail or simply letting two people know a private key is a breach in security that must always be avoided. The server administrator should never know the private key at all. It is the developer who should create the private key on his or her computer and then send the public key to the server administrator. Also note that it is not really necessary to keep back-up copies of the .ppk files. If a developer’s computer gets lost or stolen, the associated public key should be deleted from the authorized_keys file and the developer can simply generate a a new cryptographic pair on his or her new computer.
12. References
- Git – Distributed Workflows. A chapter of the Pro Git book by Scott Chacon.
- Setting up a Msysgit Server with copSSH on Windows. An article by Tim Davies. This is by far the most useful reference I found while I was investigating this. I had some trouble following some of the steps though.
- Step by Step Setup Git Server on Windows with CopSSH + msysGit and Integrate Git with Visual Studio An article by Jin Jiwei. It uses Git Extensions and the commercial version of Copssh.
- Setting up a Git server on Windows using Git for Windows and CopSSH by Johannes Schindelin.
- Working with Git on Windows. An article by Igor Baloš with good information about SSH keys and authentication issues.
- Set up a Git server with msysgit on Windows. A Stack Overflow thread with useful information.
- An Illustrated Guide to Git on Windows. A good introduction to the use of Git Gui on Windows.

Hello Jose,
you did a great job, I followed your tutorial and it work except one important thing, I think you may be forget, it is a small step “Config CopSSH with Git path” in CopSSH etc/password. the edited PATH must be
export PATH=”/bin:$syspath:$winpath:/cygdrive/c/git/bin:/cygdrive/c/git/libexec/git-core”
I found on this site http://www.codeproject.com/Articles/296398/Step-by-Step-Setup-Git-Server-on-Windows-with-CopS
thanks to your great effort
Hi Duc Tran, thanks for your comment. I think what you describe does the same thing as step 31 above. Basically, we need to enable Git calls from the Windows command line regardless of what the current working directory is, and that requires adding the Git executable paths to the PATH environment variable. I wasn’t aware that you could set these environment variables on the fly from within the password configuration file, but the effect as far as I can tell should be the same as setting it permanently through the Windows System dialog.
Hello Guy, great job!
I have a problem, I receive this error when I make a push to server:
error: cannot spawn git: No such file or directory
Can you help me?
Most likely, your problem may be due to the PATH environment variable not including the correct paths to the Git subdirectories ‘bin’ and ‘libexec/git-core’ (see step 31 above). You should check that the two paths are specified correctly.
Failing that, there is a thread in Stack Overflow where this error message is also mentioned in connection with the repository having a large number of tags: http://stackoverflow.com/questions/14867232/when-pushing-branches-and-tags-get-error-cannot-spawn-git-no-such-file-or-dir.
Great article!
I have just created a GIT server on a Windows XP x64 machine following your instructions and it works! (Windows 7 on the client) The only issue was that I tried to create the server on the Windows 7 machine, and the I tried to use the client from there too (for testing purposes, I only wanted to install things on one computer, first). The problem was that, since it was running the server, I had to point GIT_SSH to ssh.exe and, since it was running the client, I also had to point GIT_SSH to plink.exe. I could not make both so I moved the server to the other machine and it now works without problems. Oh, and I also had to configure (I mean, disable) Windows Firewall on the server, since it prevented Putty from getting connected.
Thanks!
Thanks for your comment, Alejandro. I’m glad it helped.
Hi,
thank you for such a cleared tutorial. It worked for me.
I have one issue. I wanted to add multiple accounts for the ssh connections and I did it through the copSSH Accept Users interface. Later I modified the path on the /etc/passwd file, similar to the “dev” account. I have inserted the public keys on the authorized_keys file. But the problem is when I try “ssh dev2@url.com“, the connection is closed.
Do I miss another step here?
Hi Thomas. Sorry about the late reply. I’m not familiar with how copssh manages users but I don’t think what you’re trying to do is possible in a straightforward way. Even if Copssh lets you activate alternative user accounts, my understanding is that the service can only be run in the context of one Windows user account. The active account is listed in one of the columns next to the service name in the Services dialog (services.exe). If you really want to run the service on the server machine simultaneously under several Windows user accounts, you’d probably have to make several copies of the Copssh installation directory and register the Windows service with a different name for each user account (you can’t simply run the setup program with different target locations because the service name would still be the same). This Stack Overflow thread may help: http://stackoverflow.com/questions/8725082
Anyway, I’m not sure I understand what you’re trying to accomplish here. The ‘dev’ user account I created is just meant to be a dummy windows user account that CopSSH requires for the SSH connections. We could have used the account created by the CopSSH installer, but I chose to create an account with the ‘dev’ name so that a network administrator would understand that that user account is related to the development team. I’m not sure if there would be any reason, security-related or otherwise, to require separate SSH users. The fact that you want to authorise several individual developers is already taken care of by the different public key entries in the ‘authorized_keys’ file.
I went through all steps.
And from Mac when I tried to clone, it says
Cloning into ‘oss’…
bash: git-upload-pack: command not found
fatal: The remote end hung up unexpectedly
However I can find ‘git-upload-pack’ from command prompt in server and from mac (client) terminal.
Am I missing anything?
Hi CIsSharp. The fact that you’re cloning from Mac OS X shouldn’t be relevant. But just to be sure, if you have a Git client on a Windows computer, can you check that you’re still getting the same error? If the answer is ‘yes’, as I suspect, the problem is clearly happening server-side. Otherwise, we’d have to check what’s going on when the Mac SSH client sends the clone request to the server.
Assuming it is a server-side problem, I would review steps 30 to 32 above. Basically, if ‘git-upload-pack’ can’t be found, it looks as if there is a problem with the PATH environment variable. Note that both the ‘[…]\Git\bin’ and the ‘[…]\Git\libexec\git_core’ subdirectories must be added to PATH and also that the GIT_SSH variable should be set to the ‘[…]\ICW\bin\ssh.exe’ path. These environment variables must be set as system-wide variables. Make sure that you haven’t set them up as user variables for a specific user account (actually, I suppose things should work if we set them up just for the ‘dev’ account, but I haven’t tried that).
If you don’t need SSH support and you are fine with HTTP/S, you could use Bonobo Git Server. It’s much easier to set up and gives you web ui interface for repository browsing and user management.
An excellent tutorial and I want to offer my thanks for putting it together. It is never easy to rationalize the Windows/Unix worlds, even using half-way measures like CygWin.
Unfortunately the helpful chaps at ITeFIx have removed the specific version of CopSSH you use for your example and replaced it with a newer iteration. Sadly this has far fewer configuration options and critically will not allow the use of an AD user account at Step 5. To get that you have to pay £20 for the full version – which is too expensive in my opinion considering OpenSSH is free and the ease of use additions they probably point to as justification for their fee are pretty minor in the long run. £5-£6 I would certainly pay for the convenience. £20? No way in hell. BUT. Voting with one’s feet is the only option.
Any chance you could revisit this for the full OpenSSH or a different free SSH server? I appreciate the options are limited.
Just a quick follow-up to my last comment.
Given the unfortunate changes to CopSSH I was forced to use OpenSSH instead. However, I found the various dedicated ‘for windows’ distributions to be buggy and almost impossible to set up on Windows 2k3, especially if you intend to use public/private key pairs for authentication. Therefore I recommend anyone who is following this route for a network GIT server to go for the real CygWin installation instead. It does not take up a lot of space if you only install the OpenSSH distribution and I found that it ran pretty much ‘out of the box’, even with the more advanced methods of user authentication.
Thanks for the updated information. I’ve just checked and you’re right that the old CopSSH 3.1.4 version has vanished from the Itefix site. It’s pretty bad that there doesn’t seem to be any free open source SSH server for Windows at the moment. I’ve just edited the post to indicate this. It seems that Itefix now bundle the old CopSSH 3.1.4 with their free Gitwin product, which I haven’t tested. Anyway, I’m glad to hear that setting up OpenSSH with Cygwin wasn’t too much of a pain.
Actually, it seems to have vanished from the internet altogether– which is quite odd for a GPL app. You’d think someone would still have it.
This article needs a revision – Copssh 3.1.4 is an old edition. It is a security product and we need to keep it updated. More recent versions of Copssh are available both as a product and a free edition. In addition, you can give our Gitwin a try – it is a packaging of Copssh + Git, making all the work around setting an ssh-enabled Git repository an easy task. A free edition is also available.
Thanks, Tevfik. I’ve added a couple of Update notes to the post with the current (2014) links.
What a nightmare! I’ve spent the last 6 hrs attempting to switch-over from SVN to Git and SSH has me stumped. (My server runs Windows Server 2012 R2.) With no viable SSH available, Git is a huge “no go”, though I don’t mind re-evaluating Git if/when SSH is no longer required or a correct SSH implementation becomes freely available for Windows.
IMHO, someone on the Git team should make their product fully compatible with Windows if they truly care about getting the bazillion Windows developers on board.
No viable SSH? What about Bitvise SSH? Free for personal use. Decent price for ($99.95) for commercial use. Not pushing Bitvise or anything, but don’t blame Git because it doesn’t work with CopSSH.
Why did you create an administrator account? Won’t a standard account work?
Probably just me being paranoid. Getting Git to work over SSH and Windows Server 2003 involved a lot of trial and error, and I ended up using an administrator account. But I suppose a standard user account should be enough for this.
I tried the steps with following setting and they worked just fine.
server : win serv 2008 R2, git version 1.0.4.msysgit.2, free copssh_5.0.0
client : win 8.1, git version 1.0.4.msysgit.1, putty 0.66
Only addition I had to make to get around “bash: git-upload-pack: command not found” error was to add -u option to clone like:
git clone -u “C:/Git/libexec/git-core/git-upload-pack” ssh://gitadmin@myserver:/~/test.git
here “C:/Git/libexec/git-core/git-upload-pack” is the path on server.
It also threw an error : error while loading shared libraries: libiconv-2.dll: cannot open shared object file.
It was fixed by copying the necessary dll from “Git/bin” to “Git/libexec/git-core/”.
Thanks a lot !!!